Updating a Linear Issue from a GitHub Pull Request using Webhooks
Linear is a task-tracking program that comes with great GitHub integration out of the box. In this post we'll explore how you can integrate Linear with GitHub even more closely by writing custom code.

Sam Magura

Linear is a project and task management tool that can streamline your team's development workflow and ultimately help you deliver a better product. To anyone who has used GitHub Issues, Jira, or a similar task-tracking software, Linear will feel very familiar. Though Linear shares a lot in common with these pre-existing tools, what sets it apart is its highly polished UX. My favorite thing about Linear is the balance it strikes — the product manages to feel simple and easy to use (like GitHub Issues), while offering power and configurability that's on par with Jira.
In my mind, one of the selling points of Linear is the GitHub integration. It only takes a few clicks to connect your Linear project to the GitHub repository where you dev team is coding. This integration enables Linear to provide a lot of the same features as GitHub Issues. For example, you can write "Closes ZERO-123" in your pull request description to link the PR to the ZERO-123 Linear issue. When the PR is merged, the Linear issue will be marked as complete, as you would expect.
While Linear's built-in integration with GitHub is sufficient for many teams, you might find it lacking if your team has a custom workflow. In this blog post, we'll be tackling this exact problem. The specific use case we'll address is adding a new Has Feedback issue status in Linear, and then automatically moving the Linear issue to Has Feedback when a review is posted on the GitHub PR.
Secure your secrets conveniently
Zero is a modern secrets manager built with usability at its core. Reliable and secure, it saves time and effort.

Technical Overview
To accomplish our goal, we'll need a way to be notified when someone leaves a review on the GitHub pull request, and we'll need a way to update the status of the corresponding Linear issue. For the first, we can utilize GitHub webhooks . And for the second, we can call the Linear API .
GitHub webhooks work by making a POST request to the URL of your choosing when a certain event occurs. We could use a fully-fledged web server to handle that request, but the costs of running a web server 24/7 will add up over time, even if we choose the smallest instance size in AWS / Azure / .etc. Moreover, an always-up web server feels like overkill because our code will only need to process a handful of webhook events per day. A better solution is to use a serverless function — it's less work to configure and will be completely free on any of the popular cloud platforms.
For the specific technologies we'll be using, we will write our handler code in TypeScript and deploy it as a Vercel serverless function . If you're already using Vercel (e.g. with Next.js), it's extremely easy to add serverless function support to your existing project. Even if you're not using Vercel already, it's still much easier to set up Vercel functions than it is to set up AWS Lambda or Azure Functions.
To interact with the Linear API, we're going to need a secret access token, which we can store securely in the Zero secrets manager. Instead of fetching the token over the network at runtime using the Zero TypeScript SDK, we'll make use of the new Zero Vercel integration. This integration will sync our Zero secrets to environment variables in the Vercel project, so that our function gets access to the Linear API token without any Zero-specific logic.
🔗 The full code for this example is available in the zerosecrets/examples GitHub repository.
Initializing the Vercel Functions Project
The easiest way to work with Vercel Functions is using the Vercel CLI, which you can install with
You can define Vercel functions inside an existing Next.js app, in an existing application that uses a different framework, or in a completely standalone project. Our project doesn't require a frontend, so we'll go with the third option: a standalone project.
To scaffold the project:
- Create a new directory called
github-linear-sync. - Define a
package.jsonin that directory. - Install
typescriptand@vercel/nodeas dev dependencies.
Then, create a file called api/pr-sync.ts to hold the function code. We'll start by simply logging the request body:
To run the project locally, run vercel dev in your terminal. This will make your function available at http://localhost:3000/api/pr-sync . If you visit that URL if your browser, you'll get the "Hello world" response.
Setting up the GitHub Webhook
Now that that's working, let's configure GitHub to call our function when someone posts a PR review. For GitHub to connect to the function that's running on localhost:3000, we'll need to expose that port on the internet. We can do so using ngrok, as recommended by the GitHub webhook docs. After installing ngrok , you can expose port 3000 on the web with the command
This command will display an interactive screen that shows the public URL that your service is now accessible at, among other things.
Now let's add the GitHub webhook. You'll need to choose a GitHub repository for this — it can be any repository you have admin access to. Once you've chosen, here are the steps to create the webhook:
- Navigate to the repository settings, then select Webhooks from the menu on the left.
- Click "Add webhook".
- Paste in the ngrok.io URL followed by
/api/pr-sync, e.g.https://5d36-24-56-233-28.ngrok.io/api/pr-sync. If you restart ngrok, you'll get a different URL, so you'll have to update the webhook accordingly. - Choose "Let me select individual events" and then check the box for "Pull request reviews".
If this is a production application, you should seriously consider adding a secret to the webhook, so that you can verify that requests to the Vercel function truly originated from GitHub. GitHub has a guide for this here . We won't be using a secret for this walkthrough, since it is just a proof of concept.
To test that the webhook is working, create a PR and leave a review on it. If you check the console output of the vercel dev process, you should see that the function logged the request body coming from GitHub. The payload is quite large and includes details about the action that was performed, the pull request it was performed on, and the repository that the pull request was made to.
Now that the webhook has delivered its first message, you can tell GitHub to redeliver that message, so that you don't have to post a pull request review each time you want to test a tweak to your function code. To do this, navigate to the webhook in the repository settings, open the "Recent Deliveries" tab, click one of the list items, and then click the "Redeliver" button.
Setting up Linear
If you don't have a Linear workspace already, you can create one for free on the Linear website . Once you have a workspace, enable the GitHub integration by clicking the workspace in the upper left corner and selecting "Settings". Navigate to Integrations > GitHub and click the "Connect" button next to "Connect Linear with GitHub pull requests". I recommend only granting the integration access to the specific repository you are using to test this.
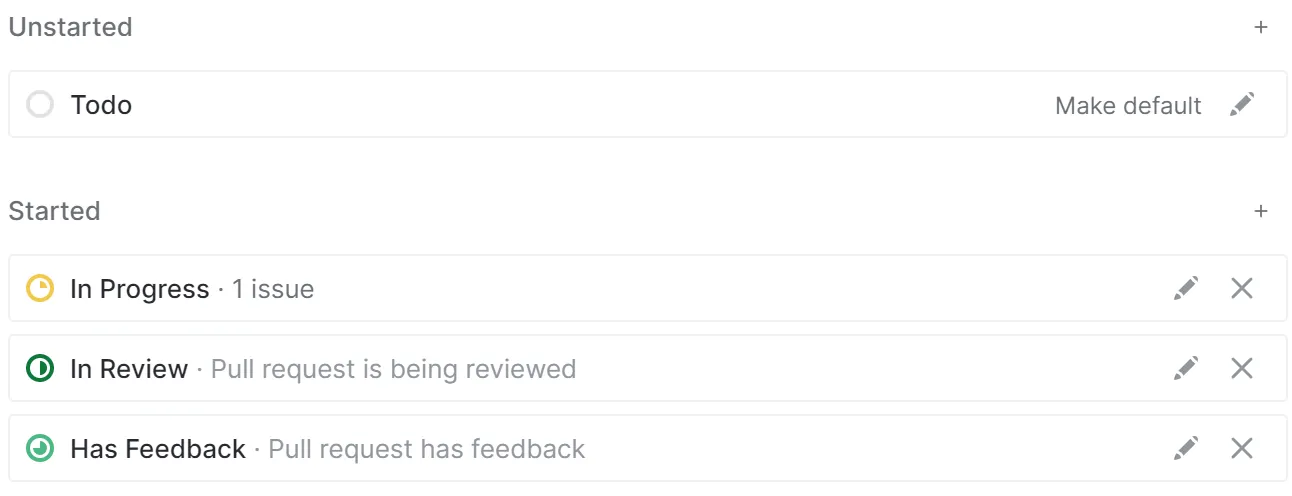
Next, we'll tweak the default Linear workflow to add a Has Feedback status. Within the workspace settings page, click on your team and select "Workflow". Then add the Has Feedback status in the "Started" category like so:

The last piece of Linear setup is to create a personal API key. You can do this by navigating to the API page, which you can find under the "My Account" heading in the menu. For now, copy the API to a text file on your local computer. We'll upload it to Zero in a bit.
To test our PR sync function end-to-end, we'll need a Linear issue, so create an issue in your Linear team if you don't already have one. Then copy the issue key and update the description of the GitHub PR to say "Closes <ISSUE_KEY>", e.g. "Closes SAM-11". This will automatically link the PR to the Linear issue.
Calling the Linear API
To call the Linear API , we will use the official Linear TypeScript API client, which is available on npm as @linear/sdk . To begin using the API client, install the package with
and instantiate the client at the top of the api/pr-sync.ts file:
As you can see, the program requires the Linear API key to be stored in an environment variable. Now, to run the project locally, you should run
If you would like to verify that the connection to Linear is working, you can add the line
to the function code. This will output all issues within the Linear project when the function is invoked.
The Missing Piece
Now that the function is being called when a PR review is submitted, and we have access to the Linear API to update the status of the issue, we have almost everything we need. Emphasis on the word almost.
The missing piece is that we need to know which Linear issue to update when a PR review is added. After a considerable search, I could not find any way in which the Linear API exposes information about the GitHub pull request that is linked to a given Linear issue.
For this proof of concept, I decided to keep it simple by choosing the Linear issue to update completely arbitrarily. If you wanted to make this project fully-functional, there is a way, but it will require a few more API calls. Here's how you could do it:
- Use the pull request ID from the webhook payload to query the GitHub API for the comments on that PR.
- Find the comment that was created automatically by the Linear integration. This comment will contain a hyperlink to the Linear issue and nothing else.
- Parse the visible text out of the comment's Markdown content using a regular expression. This gives you the key of the Linear issue, e.g. ZERO-123.
- Use the Linear API to find the issue with that key.
The approach is somewhat convoluted, but it should work.
Writing the Code
Except for that difficultly, everything should be in place for us to code the handler. Start by parsing the webhook payload JSON:
Then retrieve the Linear issue using the Linear API client:
My getLinearIssue function is just a placeholder that gets all of the issues with linearClient.issues() and then returns the issue that occurs first in the array.
Next, we check the state (a.k.a. status) of the Linear issue so that we never move a completed issue back to Has Feedback:
To set the issue state, we'll need the ID of the Has Feedback state. The ID can be obtained by getting the Has Feedback state by its name, like this:
And finally, update the issue state:
If you redeliver the webhook payload, or submit another PR review, you should see the status of the Linear issue get updated!
Deployment to Vercel
To deploy to Vercel, run
Alternatively, you can use the Vercel web app to make it so each push to your GitHub repository triggers a Vercel deployment.
Now we should switch the GitHub webhook URL to point to the production function running in Vercel. To do this, log in at vercel.com , navigate to your project, and copy the domain. Then update the GitHub webhook to use the domain of the Vercel app. If your Vercel app is called github-linear-sync, then the webhook URL should be https://github-linear-sync.vercel.app/api/pr-sync.
Uploading the Linear API Key to Zero
As a prerequisite for the next section, we need to create a Zero project and upload the Linear API key to it. Upon creating the project, you'll be shown the project's Zero token for the first and only time. We won't actually be using the Zero token for this proof of concept, but you should still save it on your local PC in case you need it later.
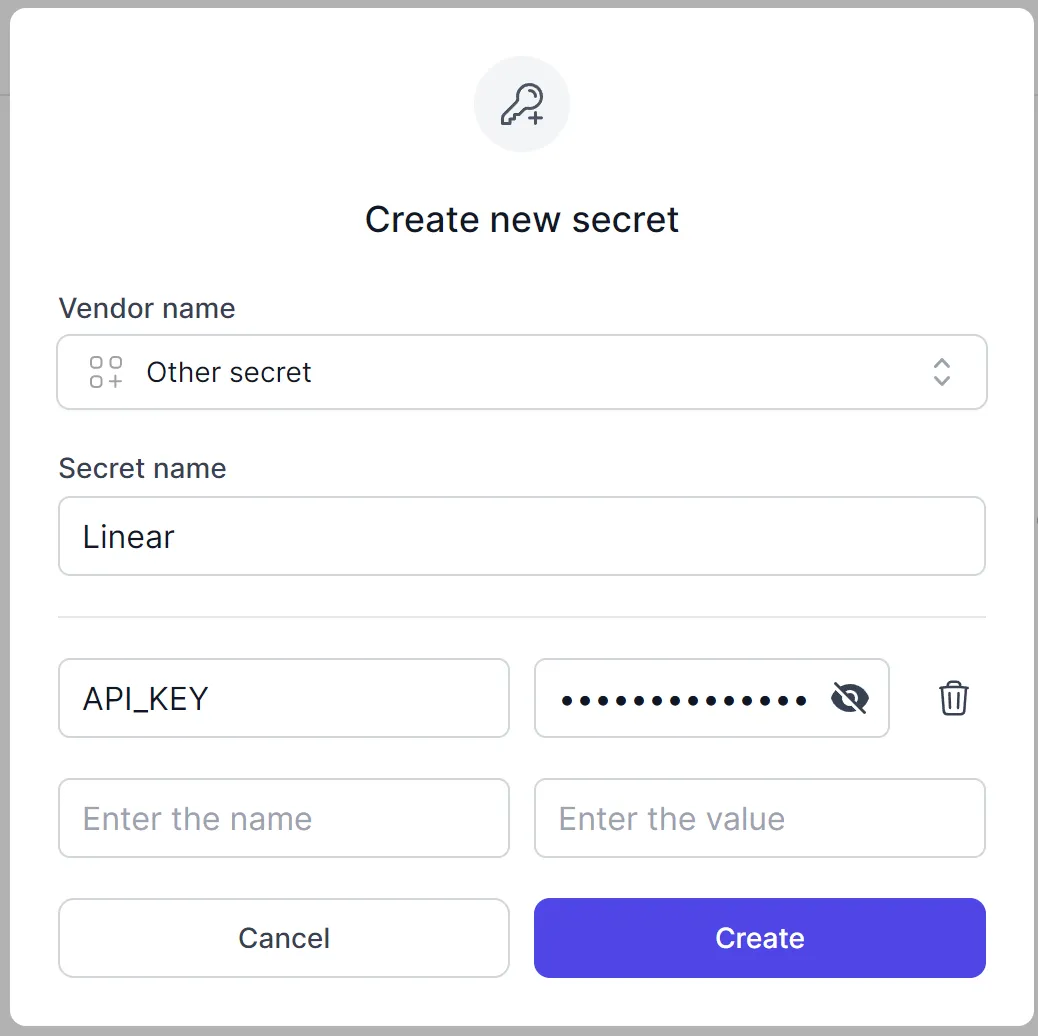
Once the project is created, click "New secret" button and fill out the form like so, pasting in the Linear API key when needed.

Enabling the Zero Vercel Integration
In all of the previous blog posts, we've added code to the project that retrieves the necessary API keys from Zero, e.g. using the Zero TypeScript SDK . That code is very simple to write, but it's still extra code — and less code is almost always better.
This time, we do not have to add any Zero-specific code to the project, thanks to the Zero Vercel integration. Once the integration is enabled, secrets will automatically be synced between Zero and the environment variables of the Vercel app.
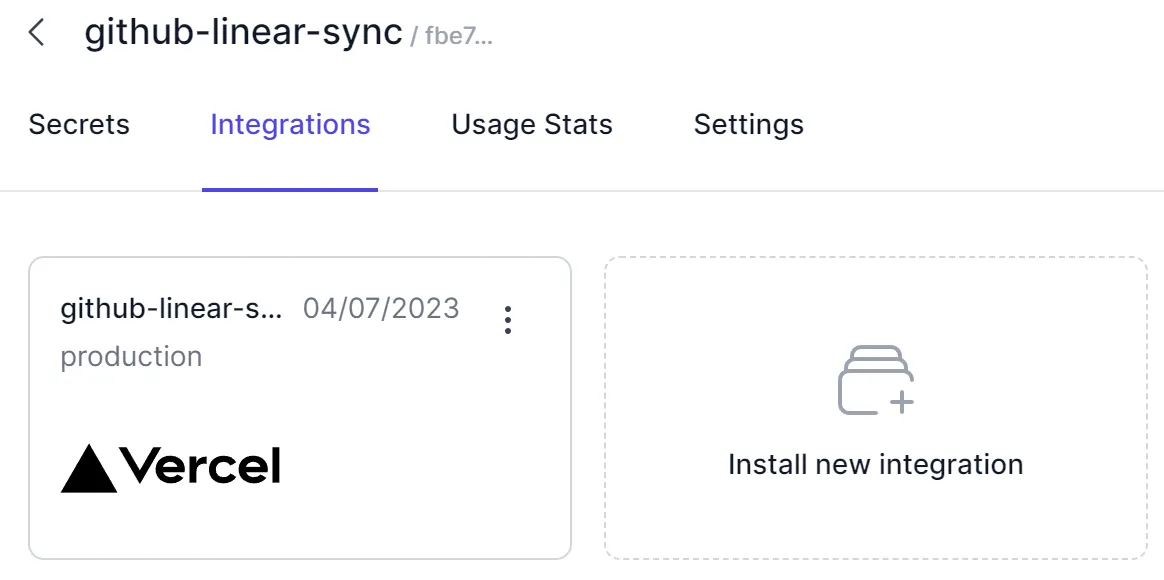
Enabling the integration is extremely simple. Just switch to the Integrations tab of the Zero project's page and click "Install new integration". This will open a wizard which guides you through the installation.
The wizard will ask you whether you want to sync secrets bidirectionally between Zero and Vercel, or unidirectionally (from Zero to Vercel, but not the other way around). I recommend the unidirectional sync option, since you will get the most value out of Zero if you treat it as the single source of truth for all of your team's secret keys. Once you view Zero as the single source of truth, there is no reason to edit a secret environment variable directly in Vercel.
When the integration has been enabled successfully, the page will look like this:

Final Testing
Everything should be complete now! To test it out, redeliver the webhook payload once more and verify that the Linear issue transitioned from Todo / In Progress to Has Feedback.
Wrapping Up
The post showed how to implement your own sync mechanism between GitHub and Linear, for when the built-in Linear GitHub integration doesn't capture custom steps in your team's workflow. While the proof of concept we built here has a pretty small scope (it only handles one very specific GitHub event), it would be straightforward to expand this project to cover a more complex custom workflow. For something like this, figuring out how to integrate with each third party service is usually most of the work — once you have that set up, adding additional logic to your code is easy.
The thing that really sets this project apart from everything else we've built on this blog is the Zero Vercel integration. Normally, integrating with Zero takes a bit of boilerplate, mostly for handling all the error cases correctly. But with the Vercel integration, all of the secrets from your Zero projects are available as plain-old environment variables, which really simplifies the code! Thank you to the Zero dev team for this slick feature.
Other articles

Build an Email Summary Bot using Claude AI, Gmail, and Slack (Part 1)
Integrate with the Gmail Push Notifications API to enable your app to intelligently respond to new emails.

Using DocuSign to Request Signatures within your App
Kickstart your integration with the DocuSign eSignature API with this guide.
Secure your secrets
Zero is a modern secrets manager built with usability at its core. Reliable and secure, it saves time and effort.